Fee Receipt
Fee Receipts
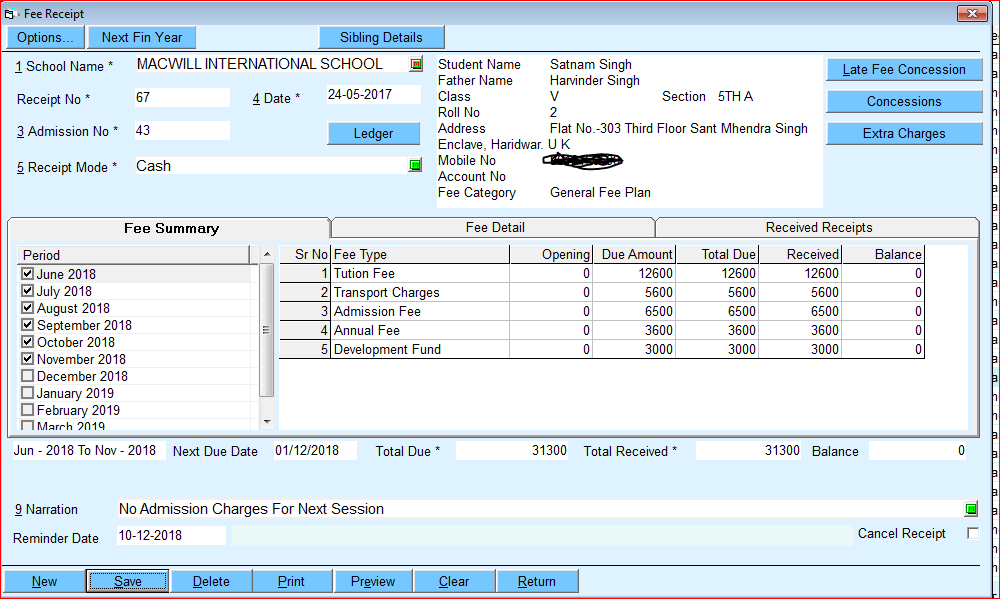
This is the form where you can receive fee from students you may choose from menu Fee > Fee Receipt either Press F6 key from keyboard or click from Bell desktop.

- Select School.
- Enter Admission No. of student. Press F1 to search student with different fields like Name, Roll No., Class etc. (There is an option for permanently open search form when you click in Admission No. text box.) After filling Admission No., detail of student like Name, Father Name, Class, Roll no. Mobile no. etc. will display on right side.
- Enter date of receiving fee amount. Your system date will display automatically in this text box; you can change date.
- Select 'M ode of Payment'. Select Cash / Bank Account according to mode of receipt. In case of bank account, select that account in which you are going to submit it.
- Receipt No will automatically generated but user can also enter manually.
- Select Period(s) for which fee has been taken.
- Fee has three tabs
- Fee Summary : It will show selected 'Periods' for fee, 'Next Due Date', Summary amount of all fee head. Suppose user has selected multiple periods so a fee head can occur multiple time. So amount will show sum for all periods for a particular fee head
- Fee Detail : It will show all selected periods and their fee heads in detail. User can enter fee amount manually by this tab
- Received Receipts : This tab shows all previous fee receipts of selected student.
- You can click on “Late Fee Concession” (in case of late fee calculated automatically).
- Fee Detail - It will display name of fee, Opening, Pending Amount of Previous Periods, Due Amount of Selected Period, Total Due, Balance Fee of previous periods plus selected period amount. User can view Ledger of student to get detail of fee.
- After Filling Total Amount you can see balance payment of selected student if any.
- You can type any remarks of selected student about fee.
- You can also enter 'Reminder' date as a submission date of pending fee if he has. Reminders will show on starting of BELL automatically.
- Click on save you can also take print by clicking on save by using option button.
Option (Fee Receipt)
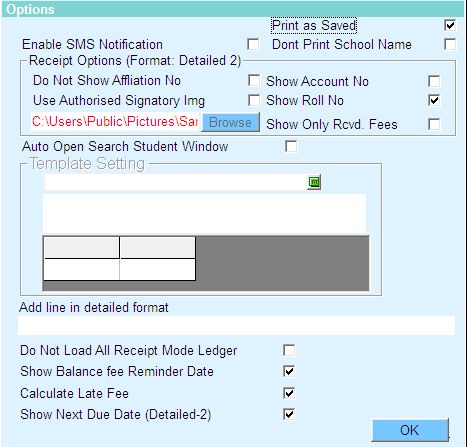
This is all about customization of Fee Receipt that's totally on client end. You just click on option button from Fee Receipt form.

- Print as save used when user want to print receipt while saving receipt.
- Enable SMS notification for sending SMS of receiving fee on student's mobile no. (to avail this option you should have to purchase SMS pack)
- Don't print school name - you may choose this tick if you want don't print school name on fee receipt. (pre printed stationary)
****Following features will be applicable only “detail 2” fee receipt format. To change receipt format use option or press F2 button from keyboard.****
- If you wouldn't display affiliation no. of your school then click on don't show affiliation no.
- Show account no. uses this option if you want to display account no. of student on fee receipt.
- You can use image of signature on fee receipt if you want. For this you have to choose an image form “Browse” Button.
- Use tick of show roll no. if you to print roll no. on fee receipt.
- Show only received fee – use this option when you want to print only received fee types on fee receipt. E.g. You have due fee type A- 100, B – 200, C -300 but user received only A -100, B - 0, C -0 in it will print only A – 100
- Kindly tick “auto open search window” if you want to open search window automatically when you click in admission no. text box at Fee Receipt.
- If you have purchased template based SMS plan then make a template setting. (for more detail contact our customer support executive)
- Tick “Do not load all ledgers” if your fee receipt mode only cash and bank.
- Show reminder use to enter “Balance Fee Reminder Date” in Fee receipt.
Created with the Personal Edition of HelpNDoc: Create cross-platform Qt Help files